Application Note 2: Modeling Polarimetric Wave Propagation In The Lower Manhattan Scene Using EM.Terrano
Contents
- 1 Introduction
- 2 An Overview of the SBR Method and k-d Tree Formalism
- 3 Setting Up the Manhattan Propagation Scene
- 4 SBR Analysis of the Manhattan Scene with a Vertical Dipole Transmitter
- 5 Using a Directional Yagi-Uda Array
- 6 Moving the Source into a Dense Area
- 7 Changing the Source Polarization
- 8 References
Introduction
In this application note, we will demonstrate how EM.Terrano can be used to analyze a very large urban canyon propagation scene using its ultrafast k-d tree based ray tracer. Specifically, we will construct a scene representing a portion of lower Manhattan, NY, with real-sized models of its buildings and terrain profile. The total size of the area is 1.3km × 1.2km, and it will be covered with a very large rectangular grid of receivers equally spaced with a uniform spacing of 5m. You can learn more about the basic procedure for setting up an propagation scene and running a SBR simulation in "EM.Terrano Tutorial Lesson 2: Analyzing An Outdoor Multipath Propagation Scene".
An Overview of the SBR Method and k-d Tree Formalism
EM.Terrano's simulation engine performs an asymptotic ray tracing analysis of a given propagation scene based on a technique known as Shoot-and-Bounce-Rays (SBR). This technique combines geometrical optics (GO) ray tracing with the uniform theory of diffraction (UTD) to model ray reflections from surfaces, ray transmission/penetration through walls and material media and diffractions at the edges and corners of buildings [1]-[2]. EM.Terrano's SBR solver is a true 3D, polarimetric and coherent electromagnetic ray tracer, which tracks all the three X, Y and Z components of the electric field and accurately computes both magnitude and phase of all field components at every point in space.
The SBR method assumes that electric fields propagate as spherical waves with the general form:
[math] A(\mathbf{r}) \frac{e^{-jkR}}{R} [/math]
where R = |r-r'| is the distance between the source and observation points, r and r' are the position vectors of the observation and source points, respectively, k = √εrk0, εr is the relative permittivity of the propagation medium, k0 = 2πf/c is the free-space propagation constant, f is the operational frequency and c is the speed of light in the free space. A(r) is complex vector function that defines the polarization and strength of the field at the observation point. Propagating spherical waves are modeled as ray tubes or beams that emanate from a field source point (or a transmitter), travel in the free space, bounce from obstacles and scatterers and are collected at a field observation point (or a receiver). As a ray tube travels in space, its footprint expands due to the beam's spatial divergence. Every scatterer in the scene is discretized into a group of conjoined triangular facets, which are created by a triangular surface mesh generator. When a propagating ray is intercepted by a facet, one of the following events takes place:
- The incident ray is reflected back into the free space.
- The incident ray penetrates into the other side of the facet.
- The incident ray is diffracted from one of the three edges of the facet.
Therefore, a ray-triangle intersection algorithm is required to test if a given ray hits a given facet of a building. Unfortunately, even very fast ray-triangle intersection algorithms are computationally very expensive. If the mesh triangles are not organized spatially, a brute-force SBR solver will have to perform N×M intersection calculations, where N is the total number of rays and M is the total number of triangular facets in the scene. This is one of the main reasons why conventional ray tracers take a significant amounts of time to solve large-scale propagation scenes that involve hundreds of buildings and thousands of rays.
The solution to the geometric problem of ray-facet intersections can be significantly accelerated by using a k-dimensional (k-d) tree to subdivide the computational domain. A k-d tree, a special case of a binary tree, is a spatial partitioning data structure that is used for organizing points in a k-dimensional space. Using a k-d tree reduces the number of ray-triangle intersection calculations that is required for each ray. In other words, the algorithm used to navigate or traverse a k-d tree is computationally less expensive than a brute-force ray-triangle intersection calculation. The k-d tree is constructed by dividing the computational domain into two partitions and then sorting all the triangles into the two partitions. This process is repeated for the two newly generated partitions until a termination criterion is met. The key to constructing a useful and computationally efficient k-d tree is intelligently deciding on when and where to split each space. A well constructed k-d tree can be many times faster than a poorly constructed one.
After constructing a k-d tree for a given propagation scene, all the triangular facets of the simulation domain are organized spatially. Each k-d tree leaf is loaded with a list of all the facets that are contained in that leaf. Each shooting ray will traverse through the k-d tree and will perform ray-triangle intersection calculations only on triangles that are contained in the traversed leaves. Many different k-d tree traversing algorithms have been developed in recent years. EM.Cube's SBR simulation engine uses an improved version of an efficient algorithm called the Recursive Ray Traversal Algorithm [3].
Setting Up the Manhattan Propagation Scene
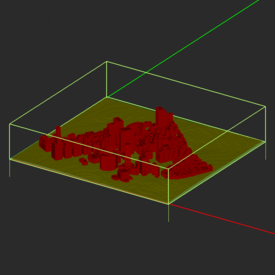
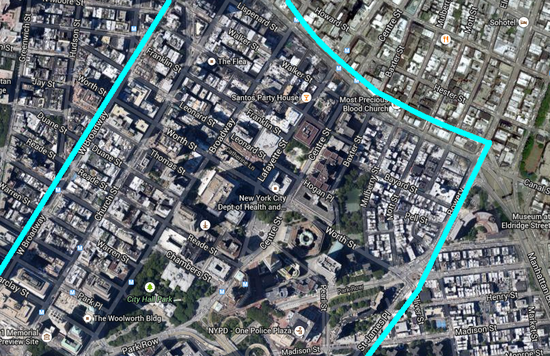
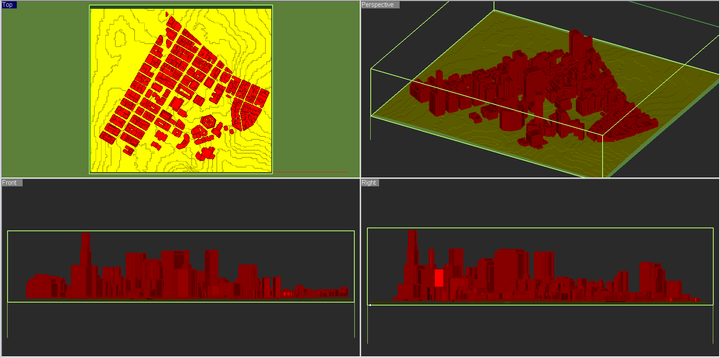
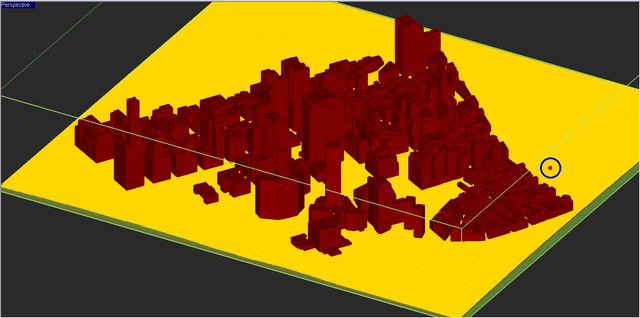
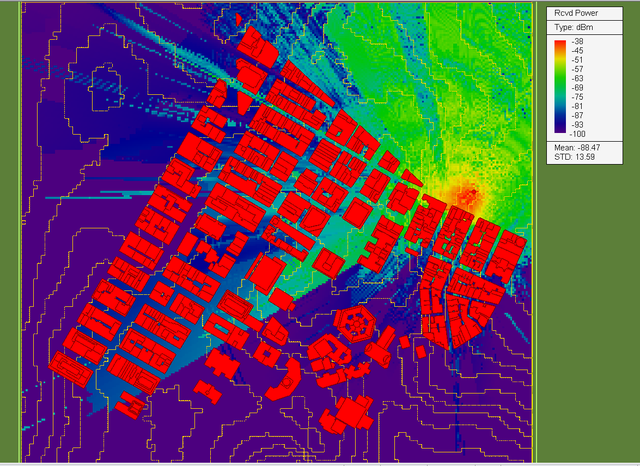
The figure below shows a part of lower Manhattan that will be modeled as a propagation for this project. The real-sized building models are imported from a STEP CAD file, while the terrain is imported from a digital elevation map (DEM) file.
For the sake of simplicity, we assume that all the buildings are made of brick with εr = 4.44 and σ = 0.001S/m. A more complex scene may be constructed by assigning different materials to different buildings. The terrain is assumed to be rocky with εr = 5 and σ = 0.005S/m. The scene involves a total of 614 solid objects of complex shapes with polygonal, curved or composite cross sections.
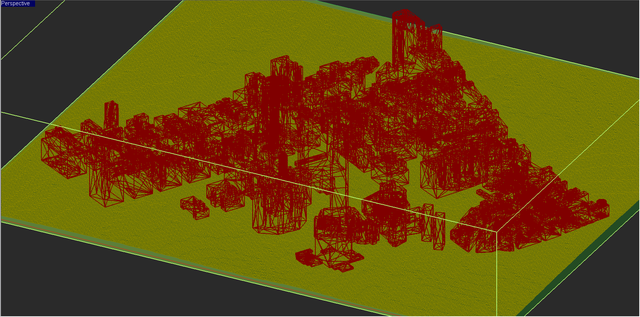
EM.Terrano's mesh generator creates a triangular surface mesh of the buildings as well as the terrain surface. The generated mesh contains a total of 146,205 triangular facets along with 27,357 diffraction edges. When a ray hits an edge, a cone of new diffracted rays are generated and injected into the scene.
EM.Terrano's default transmitter is a vertically polarized half-wave dipole antenna. The default transmitter is placed at x = 1150m and y = 700m, at a height of 30m above the ground elevation at that point. A large rectangular grid of 260 × 240 isotropic receivers is placed 1.5m above the ground elevation that covers the entire scene. A total of 62,400 receivers are used to collect the rays in the scene.
SBR Analysis of the Manhattan Scene with a Vertical Dipole Transmitter
Due to the very large size of the propagation scene, we choose an angular resolution of 0.1° for this simulation. This generates a total of 648,000 initial rays that emanate from the transmitter in all directions. The reflected rays are limited to a maximum of 10 bounces. The sensitivity of the receivers is set to -100dBm. This means that if the power of any ray falls below this threshold before reaching a receiver, that ray is terminated in the scene.
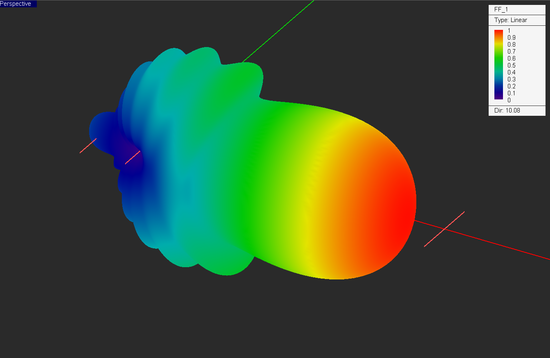
Using a Directional Yagi-Uda Array
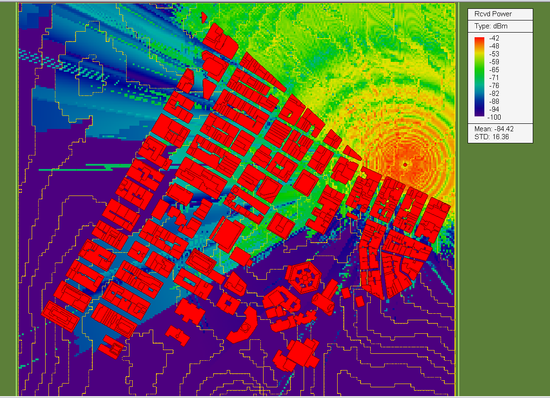
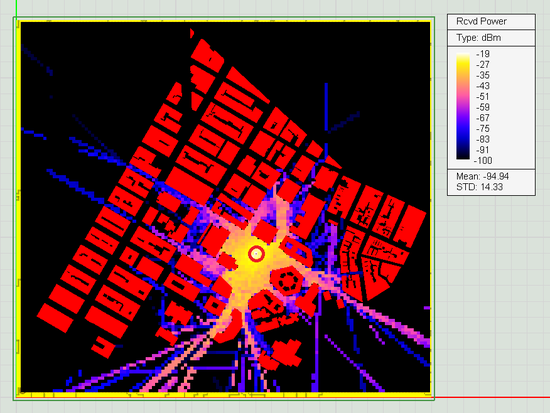
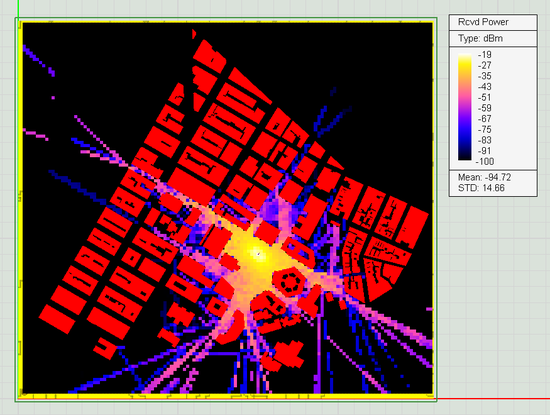
Run an SBR analysis of the project's scene and visualize the received power coverage map as shown the opposite figure. Keep in mind that the mesh generation may take a fairly long amount of time. Have patience and let EM.Cube finish its job. From the figure you can see that the wireless coverage barley penetrates into the streets due to the dense configuration of impenetrable buildings.
Also, note how fast EM.Cube's SBR solver completes the simulation process after the mesh has been generated. Below is a summary of some simulation statistics:
- Number of building facets: 29,997
- Number of building edges: 11,060
- Number of terrain facets: 122,722
- Total number of facets: 152,719
- Number of sources (or transmitters): 1
- Number of receivers: 14,848
- Number of k-d tree nodes: 142,318
- Number of transmitted rays: 64,980
Moving the Source into a Dense Area
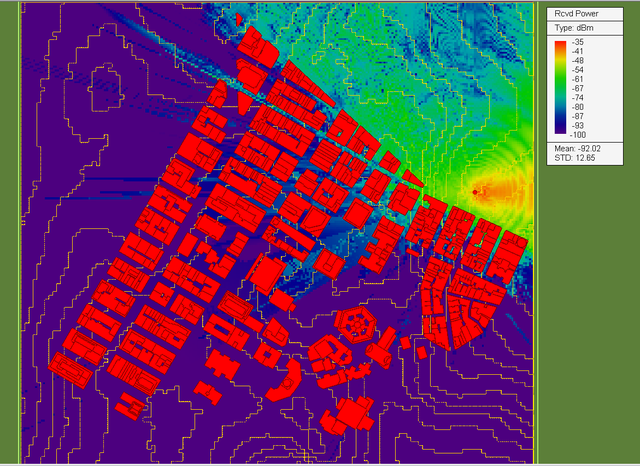
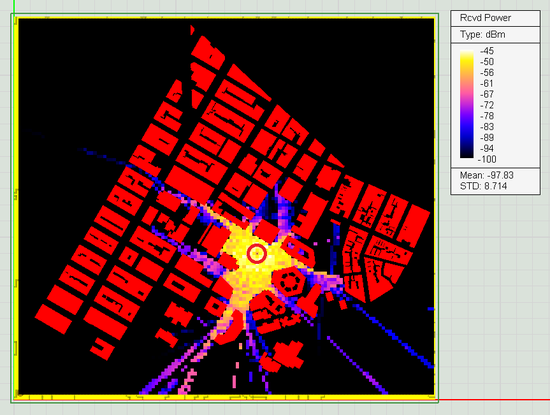
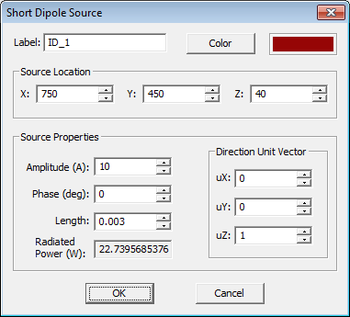
Next, open the property dialog of the short dipole source and move its coordinated to (750m, 450m, 40m), keeping it at the same height as before. Run a new SBR simulation of the scene and visualize the received coverage map.
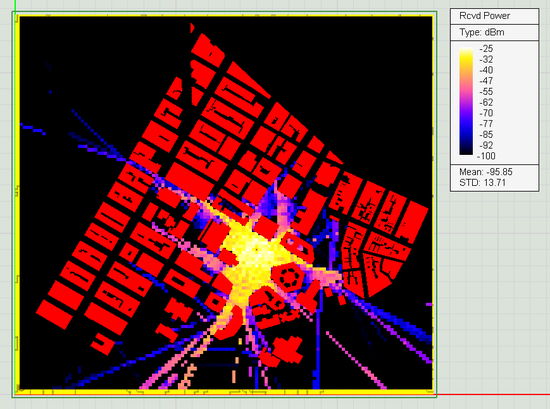
As you can see from the above figure, the coverage area is still very limited, with a few streets getting some coverage. If you open the property dialog of the short dipole source, you will notice a default value of 1A for the dipole current. The dialog also shows a value of 227.4mW for the dipole source's radiated power. Increase the dipole current to 10A. This will increase the radiated power 100-fold to 22.7W, as the power of a short dipole radiator varies as |I|2. Run a new SBR simulation and compare the coverage maps.
Overall, increasing the transmitted power lifts the coverage map by 20dB (100-fold) as you can verify from the maximum received power values in the two plots. However, the dense array of nearby buildings still block most of the coverage into the streets even though a good number of new signal paths have appeared in the latest coverage map.
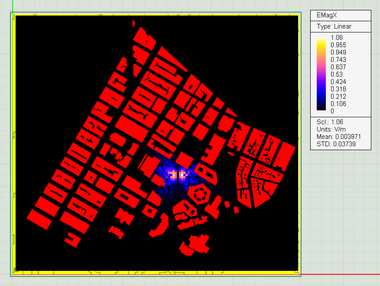
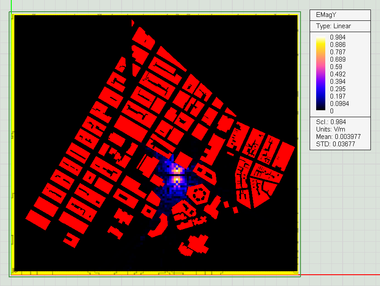
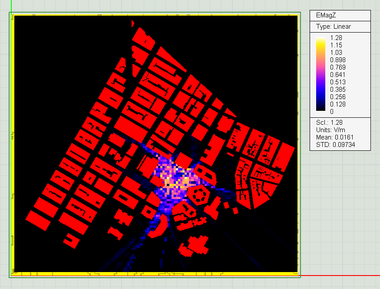
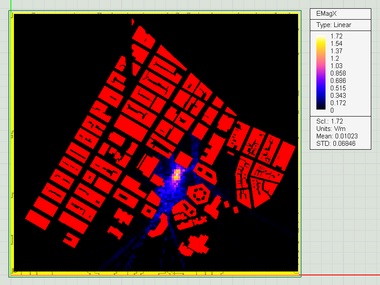
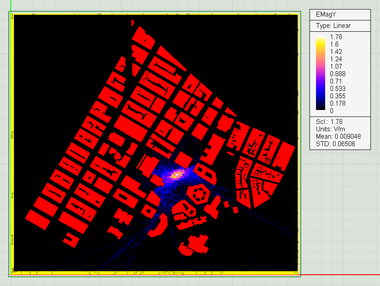
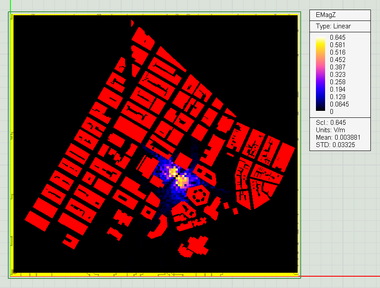
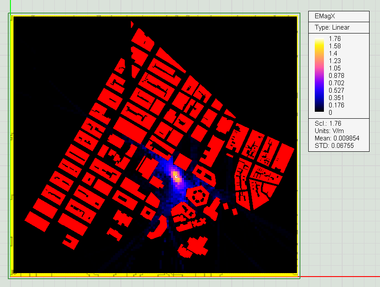
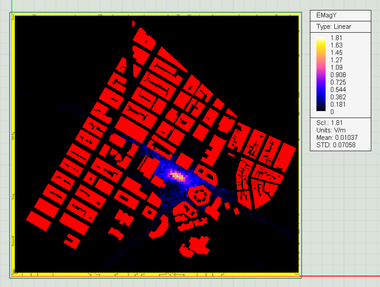
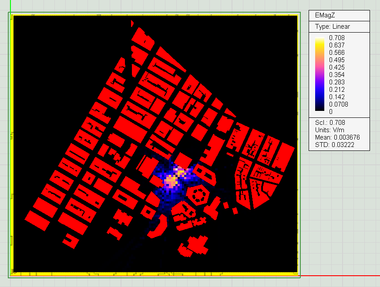
The figures below show the distribution of the three X, Y and Z components of the electric field in the Manhattan scene. Note that your short dipole source is vertically polarized. The X and Y field components are a result of multipath effects.
Changing the Source Polarization
In the last part of this tutorial lesson, you will change the polarization of your short dipole transmitter and see the effect of the polarization change on the coverage map. Open the property dialog of the source and change its "Direction Unit Vector" to uX = 1, uY = -1, and uZ = 0. This will align the short dipole radiator parallel to the direction of most nearby streets. Keep the same 10A dipole current. If you close the source dialog and open it again, you will notice that the direction vector has been normalized as uX = 0.707, uY = -0.707, and uZ = 0. Run an SBR analysis of the scene and visualize the received power coverage map.
From the above figure, you can see that the maximum received power level has increased by about 6dB. You can also see more signal paths compared to the vertical polarization case. Visualize the three electric field component distribution maps and compare them with the data of the previous case. Note that in this case, the Z-component of the electric field is entirely due to multipath effects.
Next, rotate your transmitter by 90° counterclockwise. This is equivalent to changing the "Direction Unit Vector" of the short dipole source to uX = 0.707, uY = 0.707, and uZ = 0. in this new orientation, your source is aligned perpendicular to the direction of most nearby streets. Keep the same 10A dipole current. Run an SBR analysis of the scene and visualize the received power coverage map. You will find that although the rotation of the dipole source does not change the maximum received power level, more penetrating signal paths appear on the nearby streets and they extend to longer distances.
Also visualize the three electric field component distribution maps. The Ex and Ey field maps are consistent with the radiation pattern of the short dipole radiator, which has a donut shape with its maximum normal to the dipole axis.
References
[1] H. Ling, R. C. Chou, and S. W. Lee, "Shooting and bouncing rays: Calculating the RCS of an arbitrarily shaped cavity," IEEE Trans. Antennas Propagat., vol. 37, no. 2, pp. 194–205, 1989.
[2] S-H Chen and S-K Jeng, "An SBR/image approach for radio wave propagation in indoor environments with metallic furniture," IEEE Trans. Antennas & Propagat., vol. 45, No. 1, pp. 98-106, 1997.
[3] M. Hapala and V. Havran. Review: Kd-tree traversal algorithms for ray tracing. Computer Graphics Forum, 30(1):199213, March 2011.
