Basic Tutorial Lesson 6: Exploring Simple Rectifier Circuits Using Ideal Transformers
Contents
What You Will Learn
In this tutorial you will learn how to use RF.Spice's transformer models. You will build and test half-wave and full-wave rectifier circuits and perform Fourier analysis of the waveforms.
Building and Testing a Basic Transformer Circuit
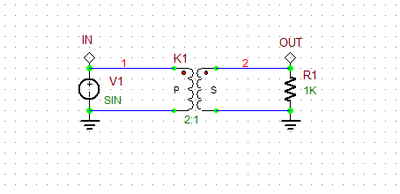
The following is a list of parts needed for this part of the tutorial lesson:
| Part Name | Part Type | Part Value |
|---|---|---|
| V1 | Voltage Source | Sinusoidal, Vpeak = 20, f = 1kHz |
| R1 | Resistor | 1k |
| K1 | Ideal Transformer | n = 2 |
| IN, OUT | Voltage Probe Marker | N/A |
The figure below shows the property dialog of the ideal transformer device. The default value of "Primary-to-Secondary Turns Ratio" is 2, which you will keep for this project.
You can access the "Ideal Transformer" part from the menu item Menu > Parts > Passive Devices > Transformers > Ideal Transformer or simply using the keyboard shortcut K. Place the parts and connect them as shown in the figure below. Make sure to ground the negative pins of the transformer both at the primary and secondary sides.
Run a Transient Test of this circuit with the parameters specified below:
| Start Time | 0 |
|---|---|
| Stop Time | 5m |
| Linearize Step | 10u |
| Step Ceiling | 1u |
| Preset Graph Plots | v(in), v(out) |
The results for the input and output voltages are shown in the figure below:
Next, run another Transient Test of this circuit with different signals to plots:
| Start Time | 0 |
|---|---|
| Stop Time | 5m |
| Linearize Step | 10u |
| Step Ceiling | 1u |
| Preset Graph Plots | i(v1), i(r1) |
The results for the input and output currents passing through the voltage source and load resistor, respectively, are shown in the figure below:
It is easy to verify your results with the ideal transformer theory:
[math] \frac{v_S}{v_P} = \frac{v_{out}}{v_{in}} = \frac{10V}{20V} = \frac{1}{2} = \frac{1}{n} [/math]
[math] \frac{i_S}{i_P} = \frac{i(R1)}{i(V1)} = \frac{-10mA}{5mA} = -2 = -n [/math]
where vP and vS are the primary and secondary voltages, respectively, and iP and iS are the primary and secondary currents, respectively.
Running a Fourier Analysis
Your input and output voltages in the circuit of the previous parts are pure single-tone sinusoidal with a frequency of 1kHz. if you perform a Fourier analysis of the output voltage, you would expect to see spectral content only a 1kHz. RF.Spice A/D lets you perform a Fourier analysis in conjunction with its "Transient Test". For this purpose, you need to check the Apply Fourier checkbox in the Transient Test Panel. Then click the Fourier Setup button to open the Fourier Transform Settings dialog. Set the Fundamental Frequency to 1kHz, set the positive output node to "2" for the output voltage and set the reference output node to "0" for the ground.
Run a new Transient Test of this circuit with the parameters specified below:
| Start Time | 0 |
|---|---|
| Stop Time | 5m |
| Linearize Step | 10u |
| Step Ceiling | 1u |
| Preset Graph Plots | v(in), v(out) |
At the end of the simulation, an additional bar chart graph is added to the Data Manager window as shown below. Note almost zero spectral contents at DC and all the higher harmonics.
Building and Testing a Half-Wave Rectifier
The following is a list of parts needed for this part of the tutorial lesson:
| Part Name | Part Type | Part Value |
|---|---|---|
| V1 | Voltage Source | Sinusoidal, Vpeak = 1, f = 1kHz |
| R1 | Resistor | 1k |
| K1 | Ideal Transformer | n = 2 |
| D1 | Generic Diode | Defaults |
| IN, OUT | Voltage Probe Marker | N/A |
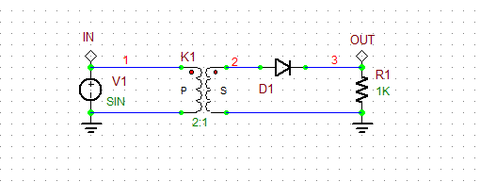
By inserting a diode before the load resistor, you can turn the your circuit to a half-wave rectifier as shown in the figure below
Run a Transient Test of this circuit with the parameters specified below:
| Start Time | 0 |
|---|---|
| Stop Time | 5m |
| Linearize Step | 10u |
| Step Ceiling | 1u |
| Preset Graph Plots | v(in), v(out) |
| Fourier Analysis | Fund. Freq.: 1kHz, Signal: Node 3 |
The results for the input and output voltages as well as the spectral contents of the output signal are shown in the figures below. The output voltage samples the positive half-cycles of the input sinusoid. As you would expect, the output signal has significant spectral contents at DC and higher harmonics.
Building and Testing a Full-Wave Bridge Rectifier
The following is a list of parts needed for this part of the tutorial lesson:
| Part Name | Part Type | Part Value |
|---|---|---|
| V1 | Voltage Source | Sinusoidal, Vpeak = 1, f = 1kHz |
| R1 | Resistor | 1k |
| K1 | Ideal Transformer | n = 2 |
| U | Diode Bridge | Defaults |
| IN, OUT | Voltage Probe Marker | N/A |
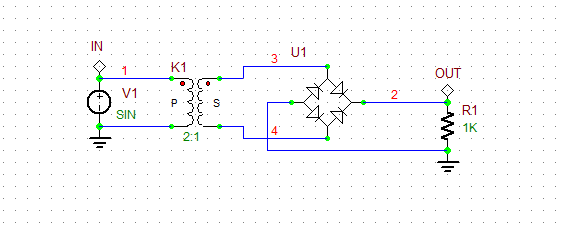
You can access the diode bridge part form the menu item Menu > Parts > Active Devices > Diodes > Diode Bridge. Place and connect the parts as shown below:
Run a Transient Test of this circuit with the parameters specified below:


