What You Will Learn
In this tutorial you will build coaxial cable structures with and without dielectric cores using concentric cylinders and will examine their field distributions and transmission line characteristics. You will also become familiar with the concept of material hierarchy in EM.Ferma.
A coaxial transmission line consists of two concentric metallic cylinders. The interior cylinder is typically solid and is called the inner conductor. The exterior cylinder is hollow and is called the outer conductor. The space between the two concentric cylinder is filled with a dielectric material. The dielectric filling can be air or any other material.
Getting Started
Open the EM.Cube application and switch to EM.Ferma. Start a new project with the following attributes:
Creating the Concentric Metallic Cylinders
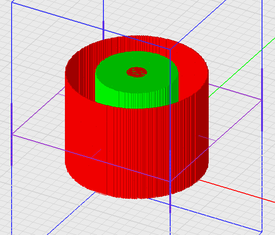
Create two PEC groups called PEC_1 and PEC_2 in the Navigation Tree and draw two cylinder objects with the following properties:
| Object | Group | LCS Coordinates | Radius | Height | Cap Ends? |
|---|---|---|---|---|---|
| Cylinder_1 | PEC_1 | (0, 0, 0) | 1mm | 10mm | Yes |
| Cylinder_2 | PEC_2 | (0, 0, 0) | 2.3mm | 10mm | No |
Define a voltage source called VS_1 with a default voltage of 1V and associate it with the PEC_1 group. Your inner conductor is held at a voltage of 1V, while your outer conductor is held at zero potential. Also, define a horizontal (Z-directed) field sensor and place it at (0, 0, 5mm).
Next, right-click on the 2D Solution Planes item in the Navigation Tree and select 2D Domain Settings... from the contextual menu. In the 2D Static Domain dialog, check the checkbox labeled Treat Structure As Longitudinally Infinite.... Click the Add button of the dialog to open up the Add/Edit Solution Plane dialog. From the "associated Field Sensor" drop-down list, choose the only option Sensor_1. Check the box labeled Perform 2D Quasi-Static Simulation. Then, from the drop-down list labeled "Signal Source", select your voltage source VS_1. This procedure is identical to what you followed in Tutorial Lesson 4 for the microstrip line.
Open the Domain Settings Dialog, select the "Default" option for the Domain Type and set the coordinates of the minimum as well as the maximum corners of the domain box to (2mm, 2mm, 10mm). Also open the Mesh Settings dialog and set the number of cells to 200, 200 and 100, along the X, Y and Z directions, respectively. Note that the mesh density along the Z-axis does not matter because you will perform a 2D analysis of the cross section of your structure in the sensor plane only.
Running a Quasi-Static Simulation and Visualizing the Results
Run a quasi-static analysis of your air-filled coaxial line. At the end of the simulation, the output message window reports the computed values of the characteristic impedance and effective permittivity of the transmission line:
Z0: 48.2803 Ohms
Epsilon_Effective: 1
The effective permittivity of 1 is expected as you have an air-filled two-conductor TEM transmission line. You can also view the electric field and electric potential results.
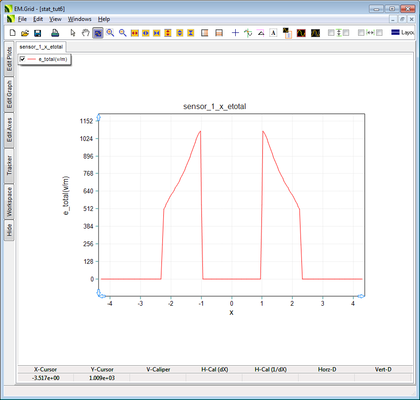
Open the Data Manager and plot the data files "Sensor_1_X_ETotal.DAT" and "Sensor_1_Y_ETotal.DAT" in EM.Grid as shown in the figures below. Given the circular symmetry of your coaxial structure, the electric field distributions along the X and Y directions are identical. Also note that the electric field lines are radially oriented pointing from the inner conductor towards the outer conductor.
To validate your simulation results, let's take a look at the analytical formulas for a coaxial cable:
[math] Z_0 = \frac{60}{\sqrt{\epsilon_{r}}} ln(b/a) = \frac{60}{\sqrt{1.0}} ln(2.3) \approx 50\Omega [/math]
[math] \Phi(r) = V_0 \left[ 1 - \frac{ln(r/a)}{ln(b/a)} \right] [/math]
[math] E_r(r) = \frac{1}{r} \frac{V_0}{ln(b/a)} [/math]
where a and b are the radius of the inner and outer conductors, respectively, and εr is the relative permittivity of the dielectric filling. Substituting a = 1mm and b = 2.3mm, we obtain the following values for the electric field and potential, which agree quite well with EM.Cube's computed values:
[math] \Phi(r = 1mm) = V_0 = 1V, \quad \quad \Phi(r = 2.3mm) = 0V [/math]
[math] E_r(r = 1mm) = \frac{1}{0.001} \frac{1}{ln(2.3)} = 1200V/m, \quad \quad E_r(r = 2.3mm) = \frac{1}{0.0023} \frac{1}{ln(2.3)} = 522V/m[/math]
From the above figures, you can see the 1/r decay of the electric field along the radial direction from the inner conductor to the outer conductor.
Analyzing a Coaxial Line with Dielectric Filling
In the this part of the tutorial lesson, you will analyze a coaxial cable with a dielectric core made of "Mica" with εr = 5.4. Keep the same inner conductor cylinder of the previous part. But increase the radius of the outer conductor cylinder to 6.93mm. Also, define a new dielectric material group in the Navigation Tree and select Mica as the material from EM.Cube's Material List. Under Dielectric_1, draw a new Cylinder of radius 6.93mm with both ends capped. The following table summarizes the geometrical parameters:
| Object | Group | LCS Coordinates | Radius | Height | Cap Ends? |
|---|---|---|---|---|---|
| Cylinder_1 | PEC_1 | (0, 0, 0) | 1mm | 10mm | Yes |
| Cylinder_2 | PEC_2 | (0, 0, 0) | 6.93mm | 10mm | No |
| Cylinder_3 | Dielectric_1 | (0, 0, 0) | 6.93mm | 10mm | Yes |
Keep the same voltage source, field sensor and mesh density as in the previous part. Note that you used a solid dielectric cylinder instead of a hollow dielectric cylinder to model the dielectric core of your coaxial cable. This is because in EM.Cube's Static and FDTD Modules, a material hierarchy system is in effect, in which a PEC has precedence over a dielectric material. This means that if a PEC object and a dielectric object overlap each other over some region in the space, the common overlapped regions is assumed to be PEC rather than dielectric.
| |
In EM.Cube's Static Module, overlapped regions between PEC and dielectric objects are always assumed to be PEC rather than dielectric. This hierarchical rule make construction of concentric structures much easier. |
Run a quasi-static analysis of your dielectric-filled coaxial line. At the end of the simulation, the output message window reports the computed values of the characteristic impedance and effective permittivity of the transmission line:
Z0: 49.1214 Ohms
Epsilon_Effective: 5.3994
An effective permittivity of εeff = εr = 5.4 is expected as you have an homogenous two-conductor TEM transmission line. Visualize the electric field and electric potential distributions and plot the 2D graphs of the total electric field along the X-axis.
You can validate your simulation results using the analytical formulas for a dielectric-filled coaxial cable:
[math] Z_0 = \frac{60}{\sqrt{\epsilon_{r}}} ln(b/a) = \frac{60}{\sqrt{5.4}} ln(6.93) \approx 50\Omega [/math]
Â
![]() Back to EM.Ferma Tutorial Gateway
Back to EM.Ferma Tutorial Gateway


